How to grant access to Toucan in Snowflake
In order for Toucan Toco to access data in Snowflake, you might need to do some configuration in Snowflake.
This guide will take you through the steps in Snowflake We’ve also added a small Troubleshooting section at the end of this page, to help you pinpoint possible access issues and find how to fix them.
Creating a user and granting access to your database
Overview
Important
All these steps need to be done in your Snowflake instance.
Let’s say in Snowflake you have a Database called “TOUCAN_TEST”.
When you connect Toucan to Snowflake, you will need:
- a user with a given role,
- that role must be granted usage of the database TOUCAN_TEST,
- that role must be granted usage of a warehouse TOUCAN_WH.
This tutorial will help you to create all this in Snowflake.
Important
You will need elevated security privileges to do the steps in this guide. We’ll assume you have ACCOUNTADMIN or SECURITYADMIN roles.
If you don’t, please contact your Snowflake administrator. You can read more [about access control in the Snowflake documentation](https://docs.snowflake.com/en/user-guide/security-access-control-overview.html#overview-of-access-control)
1/ Connect to your Snowflake instance and access the UI
Make sure to do this with an account that has the necessary security requirements. For this part, you need at least SECURITYADMIN
2/ Use the correct role with user and role creation privileges
In the upper right corner, you should see:
- the current user
- the current role selected for the user
The role should read “acccountadmin” or “securityadmin”.
If not: click on the user name in the upper right corner > switch role > select the correct role.
Now you should see a new item in the top menu, “Account”:

If you cannot switch to the appropriate role: contact your IT.
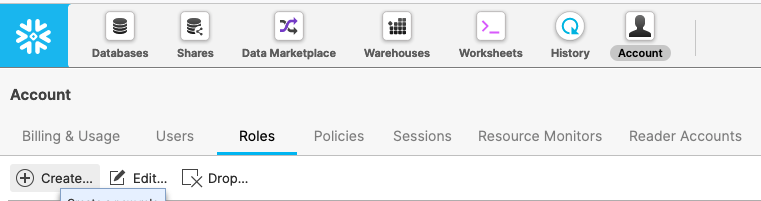
3/ Create a role to be used in the toucan app
Click on “Account”, then go to “Roles” and click “create” to create a role for Toucan:
Fill the popup window that opens by giving a name for the role, for
instance : toucan_role (or TOUCAN_ROLE, it is not case
sensitive), then click finish.

4/ Give the role to a dedicated user
- First, create a user in “Account” > “Users”
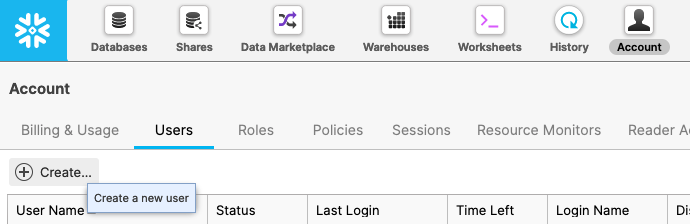
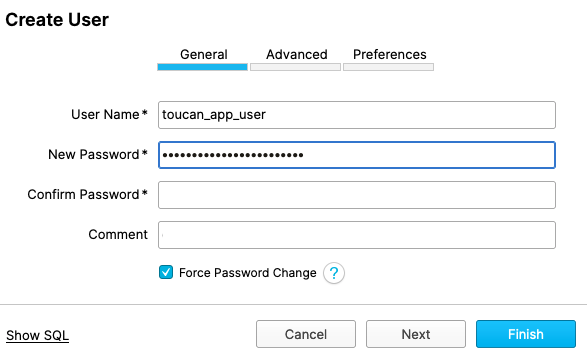
- Fill the modal with a username and secure password.
In this example, we’ll use the username: toucan_app_user (or
TOUCAN_APP_USER, it doesn’t matter). Click next.
- (not required) If you want, fill the fields in the “Advanced” step, click Next and go to “Preferences”
- Give the previously created role as default role for the user (in our
example:
toucan_role):
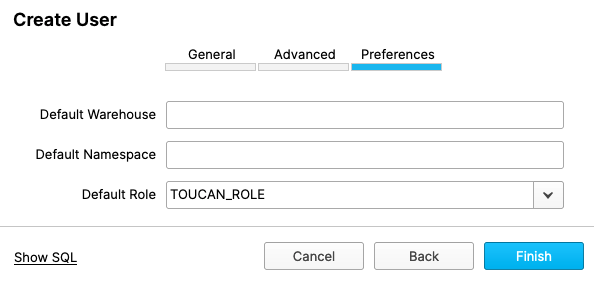
- Click finish.
5/ Grant usage of the databases you want to access in Toucan to your role
- In the top menu, go to “Databases”
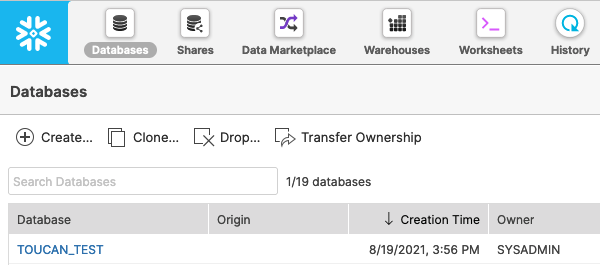
Click on the database you want to give access to
💡 Tip: click on the owner field, or anywhere on the row except on the name of the database that appears in blue.
Once you’ve clicked, a panel should open the right side of the window:

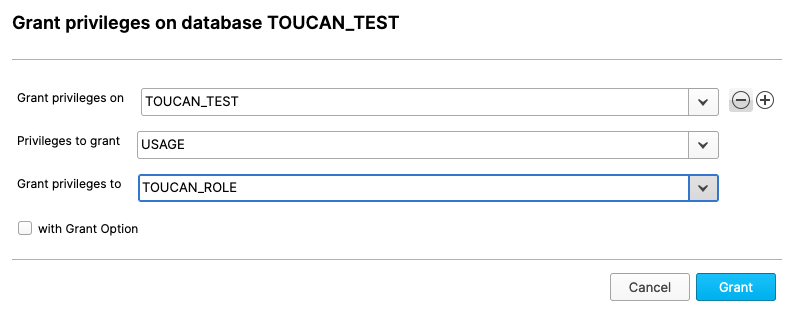
- Click “+ Grant Privileges”
→ Select “USAGE” if you just want to give view access to the DB
💡 Tip: you must click outside the “privileges to grant” dropdown to exit
→ and grant privileges to the role previously created (in our example, TOUCAN_ROLE)
You should end up with something like this:
6/ Create a warehouse to be used by the Toucan app
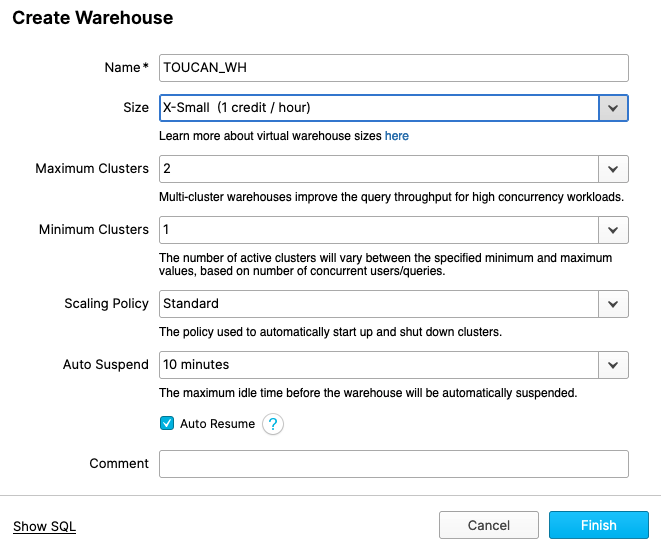
In order to execute queries in Snowflake, our connector will need a warehouse. Here we’ll create an XS warehouse and allow our TOUCAN_ROLE to use it.
If you already have a warehouse, you can skip this step.
📝 For more info on the size of warehouse you should use, check this documentation
- In the top menu, go to “Warehouses”
- Click “+ Create a new warehouse”
- Fill the form:
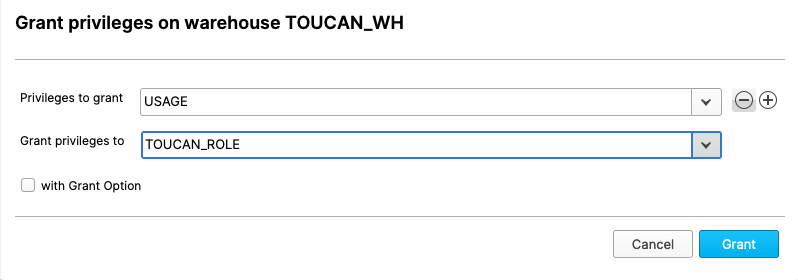
7/ Create a warehouse to be used by the Toucan app
- In the top menu, go to “Warehouses”
- Click on the warehouse you want to grant usage to
- On the panel that opens to the right, click “+ Grant privileges”
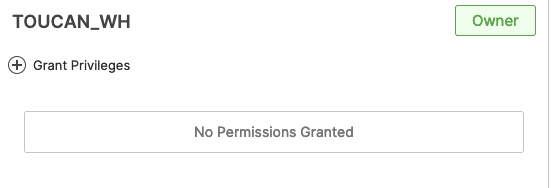
→ Grant “USAGE” privileges
💡 Tip: you must click outside the “privileges to grant” dropdown to exit
→ and grant privileges to the role previously created. in our example TOUCAN_ROLE
You should end up with something like this:
8/ Check that everything is ok
You can skip this if you’re sure or in a hurry, otherwise, let’s do a small sanity check ;)
- Open a worksheet in the Snowflake UI
- Type the following:
USE ROLE TOUCAN_ROLE;
SHOW DATABASES;
You should see the database TOUCAN_TEST (or whichever database
you’ve configured) appear in the results.
Then type:
USE ROLE TOUCAN_ROLE;
SHOW WAREHOUSES;
You should see the warehouse TOUCAN_WH (or whichever warehouse
you’ve configured) appear in the results.
Bravo! You can now setup a connection in Toucan :D
Troubleshooting database access
You’ve configured the Snowflake connector in Toucan. However, you don’t see any database or data! When you try to add data from that connector,
- you see the “databases” field in the dataset form, but you don’t see any suggestions
- If you fill the name of the database you want to access, and go to the next configuration step, you don’t see any tables or views, the UI is empty.
You’re in the right place, check our troubleshooting procedures:
I have a user and a role but I’m not sure I have database access
Let’s say your user is “TOUCAN_APP_USER”, your role is “TOUCAN_ROLE”. You want to use a database called “TOUCAN_TEST” in Snowflake.
- Connect to your Snowflake instance with the user you want to use (TOUCAN_APP_USER)
- Open a new worksheet
- Type and execute the following commands:
USE ROLE TOUCAN_ROLE;
show databases;
In the list of databases returned by that statement, you should see “TOUCAN_TEST”.
- If you do, this means you can use that role to connect to Toucan.
- If you don’t, contact your Snowflake account manager or follow the guide in this page to grant access to your database (step 5), or check the next troubleshooting section.
I’m unsure which role to use, but I have the user
Let’s say your user is TOUCAN_APP_USER. You want to access a database called TOUCAN_TEST. You do not know of a specific role you can use.
This procedure will help you find out:
- if your user has a default role that has access to the database
- if your user can use a role that has access to the database
First, do the following steps:
- Connect to Snowflake with the given user
- On the top right corner, you should see your username “TOUCAN_APP_USER”
Under the username, you’ll see the default role for that user.
(1) Check if that role has access to the TOUCAN_TEST database by running:
USE ROLE <role_found_in_interface>;
show databases;
(replace “” by the role you see on the interface)
In the list of databases returned by that statement, you should see “TOUCAN_TEST”. If you do, this means you can use that role to connect to Toucan.
If you don’t, you can see if there are other roles configured for your user:
- In the top right corner of the Snowflake interface, click on your username
- Click “Switch Role”
You’ll see a list of roles that are available for your user. Then repeat the steps above in (1) until you find a role that has access to TOUCAN_TEST.
If you cannot find any suitable role, contact your account manager or go back to the beginning of this page.