Add data to my small app
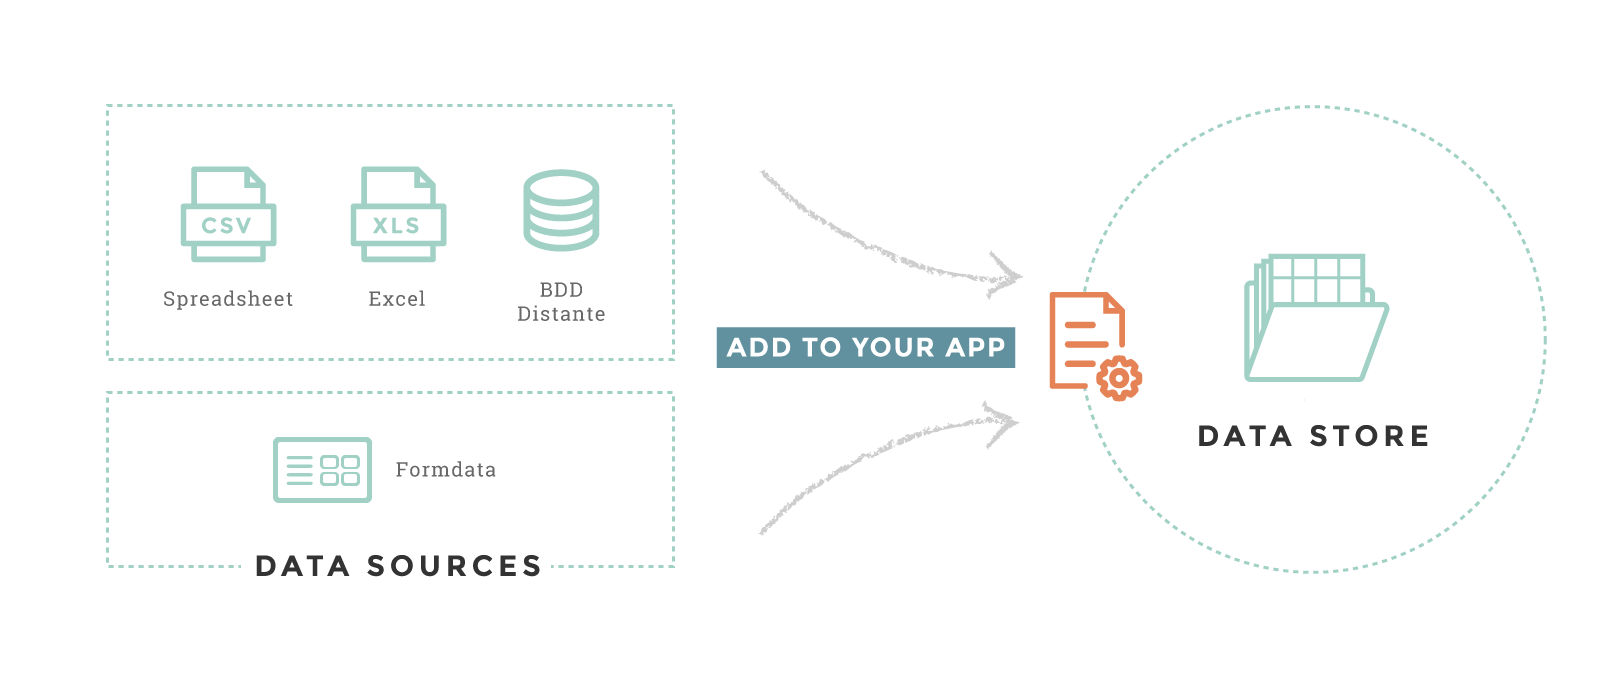
In order to add new data to your small app, we have several methods. The simplest way is to upload files. You can also use remote files - on a ftp server for example - or connect your small app to an external data provider like MongoDB.
The description of your data are the datasources. They are all
declared in a configuration file called the etl_config.cson.
Datasources must have a type - Excel, CSV, MongoDB… - and a
domain name. The domain is used to query data in your charts.
Tutorial : Product Corporation You can download the CSV file for our tutorial.
How to add a new flat file as a data source
To add a file, use the DATA > DATA SOURCES menu. You can
visualize all the datasources that you can update with a file. CSV,
Excel, XML and Parquet files are accepted.
Add your datasource block
There are two ways to add a datasource :
- using the studio, only for files
- editing etl_config.cson file
Tutorial : Product Corporation Solution 1 (only for files) :
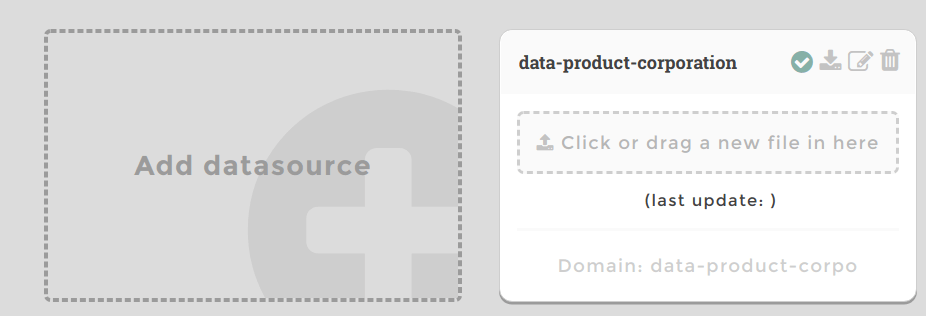
- Drop your file on
Add datasource. The fields are already filled : domainis the name used to query data in your chart : data-product-profileis the name of your file on our server (it does not have to be the same as your file name) : data-product-corporation.csv- Save changes. You have created a new datasource block.
Solution 2 :
- Click on the
FILESmenu option. - Download the etl_config.cson as
Staging file.
- Add your datasource in the block DATA_SOURCES of the etl_config.cson
DATA_SOURCES: [
 {
   domain: 'data-product-corpo'
   file: 'data-product-corporation.csv'
   skip_rows: 0
   separator: ','
   encoding: 'utf-8'
   type: 'csv'
 }
]
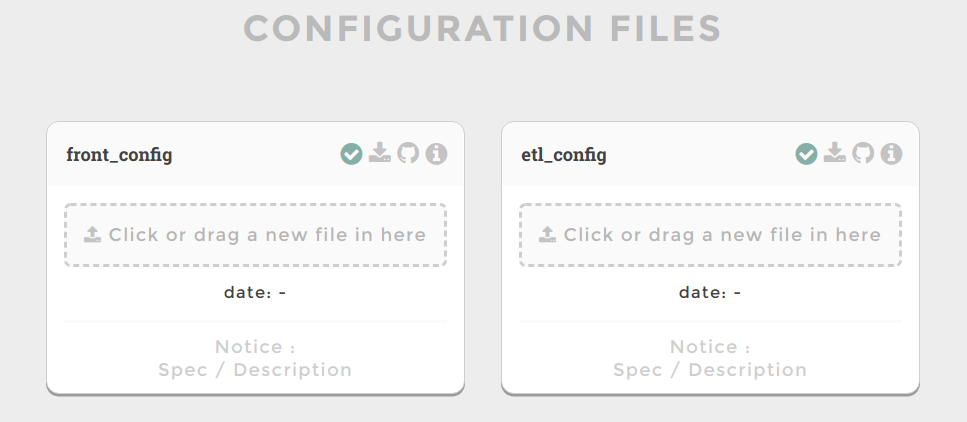
- Drag and drop your new etl_config.cson in the
CONFIG FILESpage - Go to your ‘DATA SOURCES’ page. You have created a new datasource block.
For more options, see the - File-based datasources Section.
Upload your file
To upload your file for the first time or update it, you can upload or drag and drop the file in the datasource block created. They will be stored on Toucan Toco’s servers.
Tutorial : Product Corporation
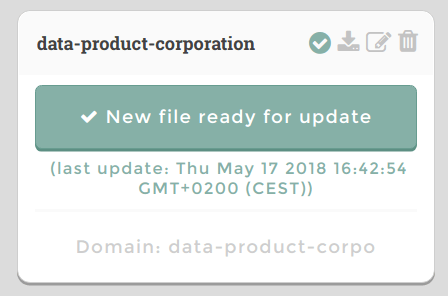
- Click or drag your file data-product-corporation.csv and wait for the validation to finish.
- Your file is now on the server and ready to be loaded as a domain.
Getting data ready for charts
Even if your datasources are declared and your file have been uploaded,
you can’t yet use it in a chart. As a last step, you need to launch an
OPERATION named Preprocess. It will load your data in the
declared domain.
To see available domains to be queried in your charts, see the section
Available domains for the staging environment in the
DATA SOURCES page.
Tutorial : Product Corporation
- See
Available domains for the staging environmentat the bottom of the page. This is the domains that can be queried in your app. Your domaindata-product-corpois not yet in it. One last effort. - Click on the button
OPERATIONSon the bottom - Choose the
Preprocessand click onSTART NOW - Wait for the end the operation :
Last operations report updated. You can have more details in the black window on the bottom of the page. - See
Show domain sampleson the bottom of the page.

- Congratulations, your new domain is here! You can see a sample of it, download it and use it in a chart.
Warning
If your data contains columns that contains the $ or .
characters, they will be replaced by __DOLLAR_SIGN__ and
__DOT__. These two characters have a special meaning in queries, so
it’s necessary to escape them to be able to query and filter on these
columns.
File-based datasources
CSV files
Declare a .csv data source with:
- the type :
csv - the file name (
file: 'my_filename.csv') - the separator used in the csv file (
separator: ',', usually',',';'or tabulations\t) - a
domainfield to identify and use the datasource (domain: 'my_csv_domain')
Other optionnal options exist:
encoding(by defaultutf-8) to choose encoding of a file. For other common encoding, see https://en.wikipedia.org/wiki/Character_encoding#Common_character_encodings.dtypeto change the type of columns, by example from int to sring.skiprows: skip n rows at the beginning of the file. Useful if your files comes with blank linesdecimal: character to recognize as the decimal separator (for example “,” in France)na_values : []: values to be interpreted as “na” (null values in your file that are not written as 0)- all options available on pandas documentation.
DATA_SOURCES = [
  domain: 'my_csv_domain1'
  type: 'csv'
  file: 'my_filename1.csv'
  separator: ';'
  encoding: 'latin-1'
  dtype:
    date: 'str'
,
  domain: 'my_csv_domain2'
  type: 'csv'
  file: 'my_filename2.csv'
  separator: ','
  skiprows: 1
]
Excel files
To add an excel data source, you just need to drag and drop your file, or select it from your computer.
Once you’ve selected your excel file, you’ll get a preview of your data along with a configuration form.
For each tab in your excel data source you can define some upload format and options to make sure you add the data you need in Toucan.
Note that you can choose to use or not a specific tab as a data source.
XML files
Declare .xml files with:
- the type (
type: 'xml') - a file name (
file: 'my_filename.xml') - a
domainfield to identify and use the datasource (domain: 'my_xml_data').
If your data is nested in the dom and you need to access it or modify it
before it is imported you can use the filter field to write a jq
filter (for ex.: filter: 'records.record'). jq is the stantard
we use to preprocess nested data souces into tabular data. See this
part of the Toucan Toco documentation for a
detailed introduction to jq. In the specific case of xml data we use
the following
spec
to transform it, and then apply your jq filter.
Example data:
<?xml version="1.0" encoding="UTF-8" standalone="yes"?>
<records>
  <record id="1">
    <title>Black album</title>
  </record>
  <record id="2">
    <title>Graffiti bridge</title>
  </record>
</records>
Datasource declaration:
DATA_SOURCES = [
   domain: 'XML Fixture'
   type: 'xml'
   file: 'fixture.xml'
   filter: '.records.record'
]
Resulting dataframe:
    @id    title
0   1       Black album
1   2       Graffiti bridge
Parquet files
Declare a .parquet data source with:
- the type :
parquet - the file name (
file: 'my_filename.parquet') - a
domainfield to identify and use the datasource (domain: 'my_parquet_domain')
DATA_SOURCES = [
  domain: 'my_parquet_domain'
  type: 'parquet'
  file: 'my_filename.parquet'
]
Remote files
Sometimes your data files are uploaded on remote servers, and it is simpler to keep them there. In this case just put your url as the file path ! We will read the file over a network connection according to the given url scheme.
For example this is how you can read a CSV file directly on Dropbox or your FTP server.
DATA_SOURCES: [
  domain: 'db_test'
  type: 'csv'
  file: 'sftp://<username>:<password>@ftp.example.com/my_folder/my_data.csv'
,
  domain: 'my_remote_data'
  type: 'csv'
  file: 'https://www.dropbox.com/s/9yu9ekfjk8kmjlm/fake_data.csv?dl=1'
]
We support ftp (as well as sftp or ftps), http (and https), S3 and a long list of other schemes (‘mms’, ‘hdl’, ‘telnet’, ‘rsync’, ‘gopher’, ‘prospero’, ‘shttp’, ‘ws’, ‘https’, ‘http’, ‘sftp’, ‘rtsp’, ‘nfs’, ‘rtspu’, ‘svn’, ‘git’, ‘sip’, ‘snews’, ‘tel’, ‘nntp’, ‘wais’, ‘svn+ssh’, ‘ftp’, ‘ftps’, ‘file’, ‘sips’, ‘git+ssh’, ‘imap’, ‘wss’).
FTP Server
When your data files are too big to be transferred via the studio data upload interface, you can store them in a FTP server. The FTP server can either be in the Toucan Toco side (ask for support to set it up) or in your side.
Tutorial : Product Corporation
- You need an access to your FTP server.
- Open Filezilla
- Connect to your FTP and look at what files are available.
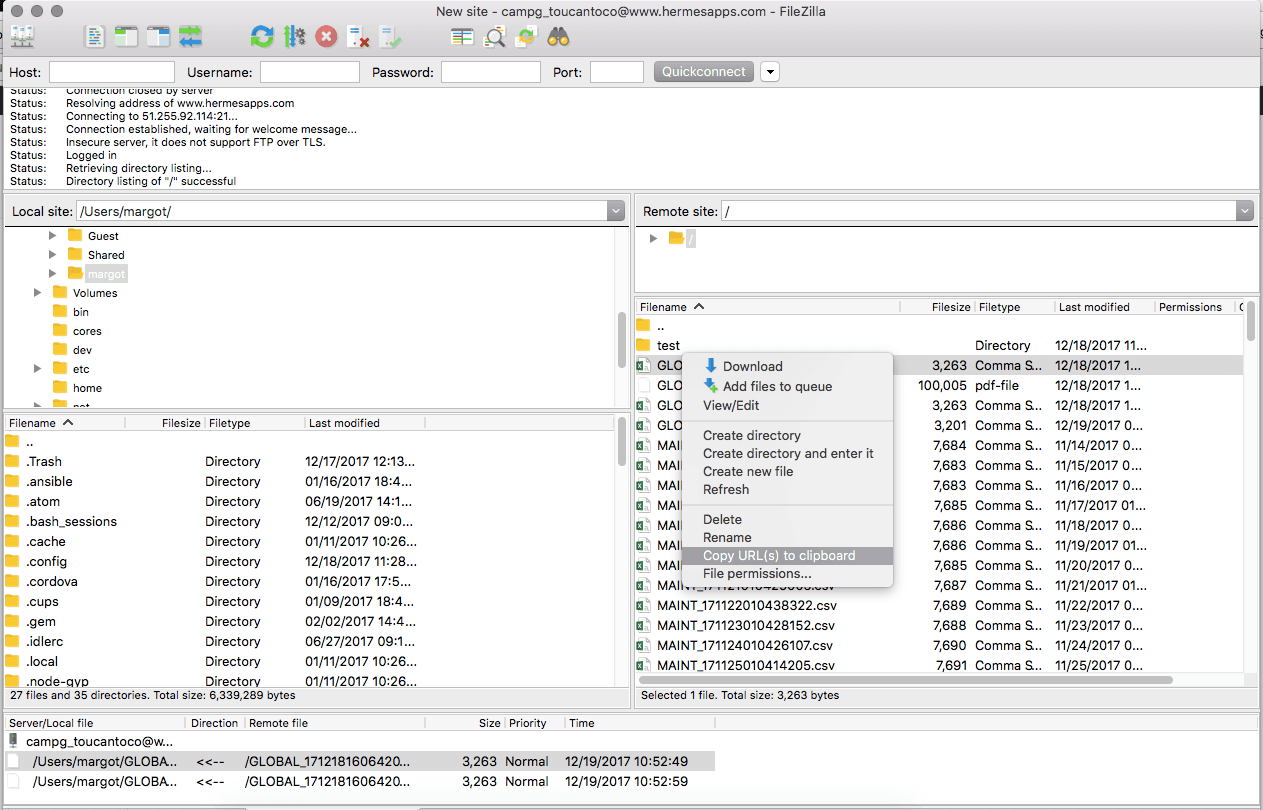
- Right-click on the one you want to use
- Select “Copy URL(s) to clipboard”
- Add your password to the url generated
Important
💡 If you don’t want to write the password in your etl_config file! Contact us via help@toucantoco.com or your Delivery contact to set up a hidden password.
- Paste the url to your datasource block
- Your datasource block is now ready
DATA_SOURCES: [
   domain: 'db_test'
   type: 'csv'
   file: 'ftps://<login>:<password>@ftps.toucantoco.com:990/my_db.csv'
   separator: ";"
]
Toucan Toco FTP Server
You can send data to Toucan Toco FTP Server with the following credentials:
- Host: ftps.toucantoco.com
- Port: 990 (for the connection) and range 64000-64321 (for data transfert)
- Protocol: FTPS (if you use FileZilla it’s
implicit FTP over TLS) - Mode: Passive Mode
- User : Given by the Toucan Toco Team
- Password: Given by the Toucan Toco Team
To simplify the configuration of a datasources hosted on the Toucan Toco FTP server you can use the following syntax:
DATA_SOURCES: [
   domain: 'db_test'
   type: 'csv'
   file: "{{ secrets.extra.ftp_toucan.baseroute }}/my_db.csv"
   separator: ";"
]
Important
Please find the public IP of the Toucan Toco FTPS server if your IT team requires it to whitelist the access.
S3 Bucket
The access key and secret key for your data files hosted on S3 buckets can be configured this way:
s3://<access key>:<secret key>@mybucket/filename'
For example:
DATA_SOURCES: [
    domain: 'my_data'
    type: 'csv'
    file: 's3://<access key>:<secret key>@mybucket/my_data.csv'
    separator: ";"
]
Note
If your access key or secret key contains special characters such as “/”, “@” or “:” you have to encode them. URL encoding converts special characters into a format that can be transmitted over the Internet. You will find more infos about this topic here (as well as an automatic encoder).
Toucan Toco can provide a S3 bucket with a dedicated AWS IAM user related to your instance.
Thus you will be able to configure your datasources block with a special configuration as following:
DATA_SOURCES: [
    domain: 'my_data'
    type: 'csv'
    file: "{{ secrets.extra.s3.s3_uri_auth_encoded }}/my_data.csv"
    separator: ";"
]
Note
If you are using a custom domain name for your S3 bucket using minio per example. Here is the syntax you should use
DATA_SOURCES: [
    domain: 'my_data'
    type: 'csv'
    file: 's3://<access key>:<secret key>@mybucket/my_data.csv'
    separator: ";"
    fetcher_kwargs:
      client_kwargs:
        endpoint_url: "https://endpoint.mydomain.com:9000"
]
Matching multiple files
You can load multiple files - uploaded on our server or on a FTP server
- in a unique domain with the option match: true. Your domain after
Preprocess will contain a column __filename__ with the name of
your files.
Tutorial Product Corporation Your corporation has now a new file of
data each month : data-product-corporation-201801.csv,
data-product-corporation-201802.csv … You want them to be loaded in a
single domain called data-product-corpo
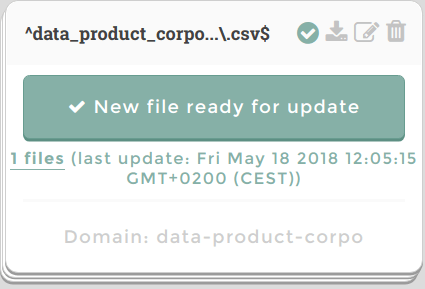
- Find the regular expression (regex) that matches your files with regex101.com.
data-product-corporation-\d{6}\.csv
- Don’t forget to use ‘^’ and ‘$’ to be more restrictive.
^data-product-corporation-\d{6}\.csv$
- Add a backslach to escape backslaches.
^data-product-corporation-\\d{6}\\.csv$
Copy your regular expression in the file option of your datasource block
Add the option
match: trueDATA_SOURCES: [ { domain: 'data-product-corpo' file: '^data-product-corporation-\\d{6}\\.csv$' skip_rows: 0 separator: ',' encoding: 'utf-8' type: 'csv' match: true } ]
Drop your etl_config.cson in the interface with your new block.
Now you can drop multiple files in the new block in the
DATA SOURCEpage and they will all be loaded in the domaindata-product-corpoafter aPreprocess
- Your domain
data-product-corpowill contain a column__filename__with the name of your files.
Connectors
Using our connectors, you can query use multiple external data providers in Toucan Toco apps. Data providers are server-side, which means they require a connection from Toucan Toco’s server to the data source.
Important
Please note we provide a daily auto-generated list of all our production IPs if your IT team requires them to whitelist the data sources access.
Connections
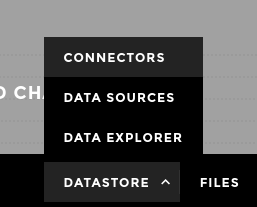
To create a new connection, visit “Datastore” > “Connectors”.
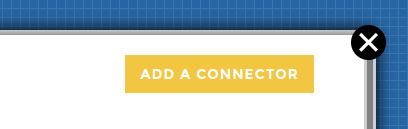
Then hit the “Add a connector” button.
Then choose among our the list of available connectors.
Visit this dedicated documentation page with the detailed set-up of our most used connectors.
Note
Some connectors need a specific installation. Please make a support request if you want us to setup one of these connectors on your Toucan instance.
Import data using these connections
Once a connection is created, you can create queries. Hit the button “Add a new query”, and fill the form to see your data appear.

Here is some help to help you understand what is required for our most used connectors.
Once satisfied, you can activate the “load” checkbox to indicate that you want this data to become a domain, loaded in Toucan’s database for use in your application.
Note
A “live data” toggle is also present. This a legacy of doing live data and is no more recommended. Read below to discover an easier and faster way to do live data.
Bypass datastore querying directly your live data
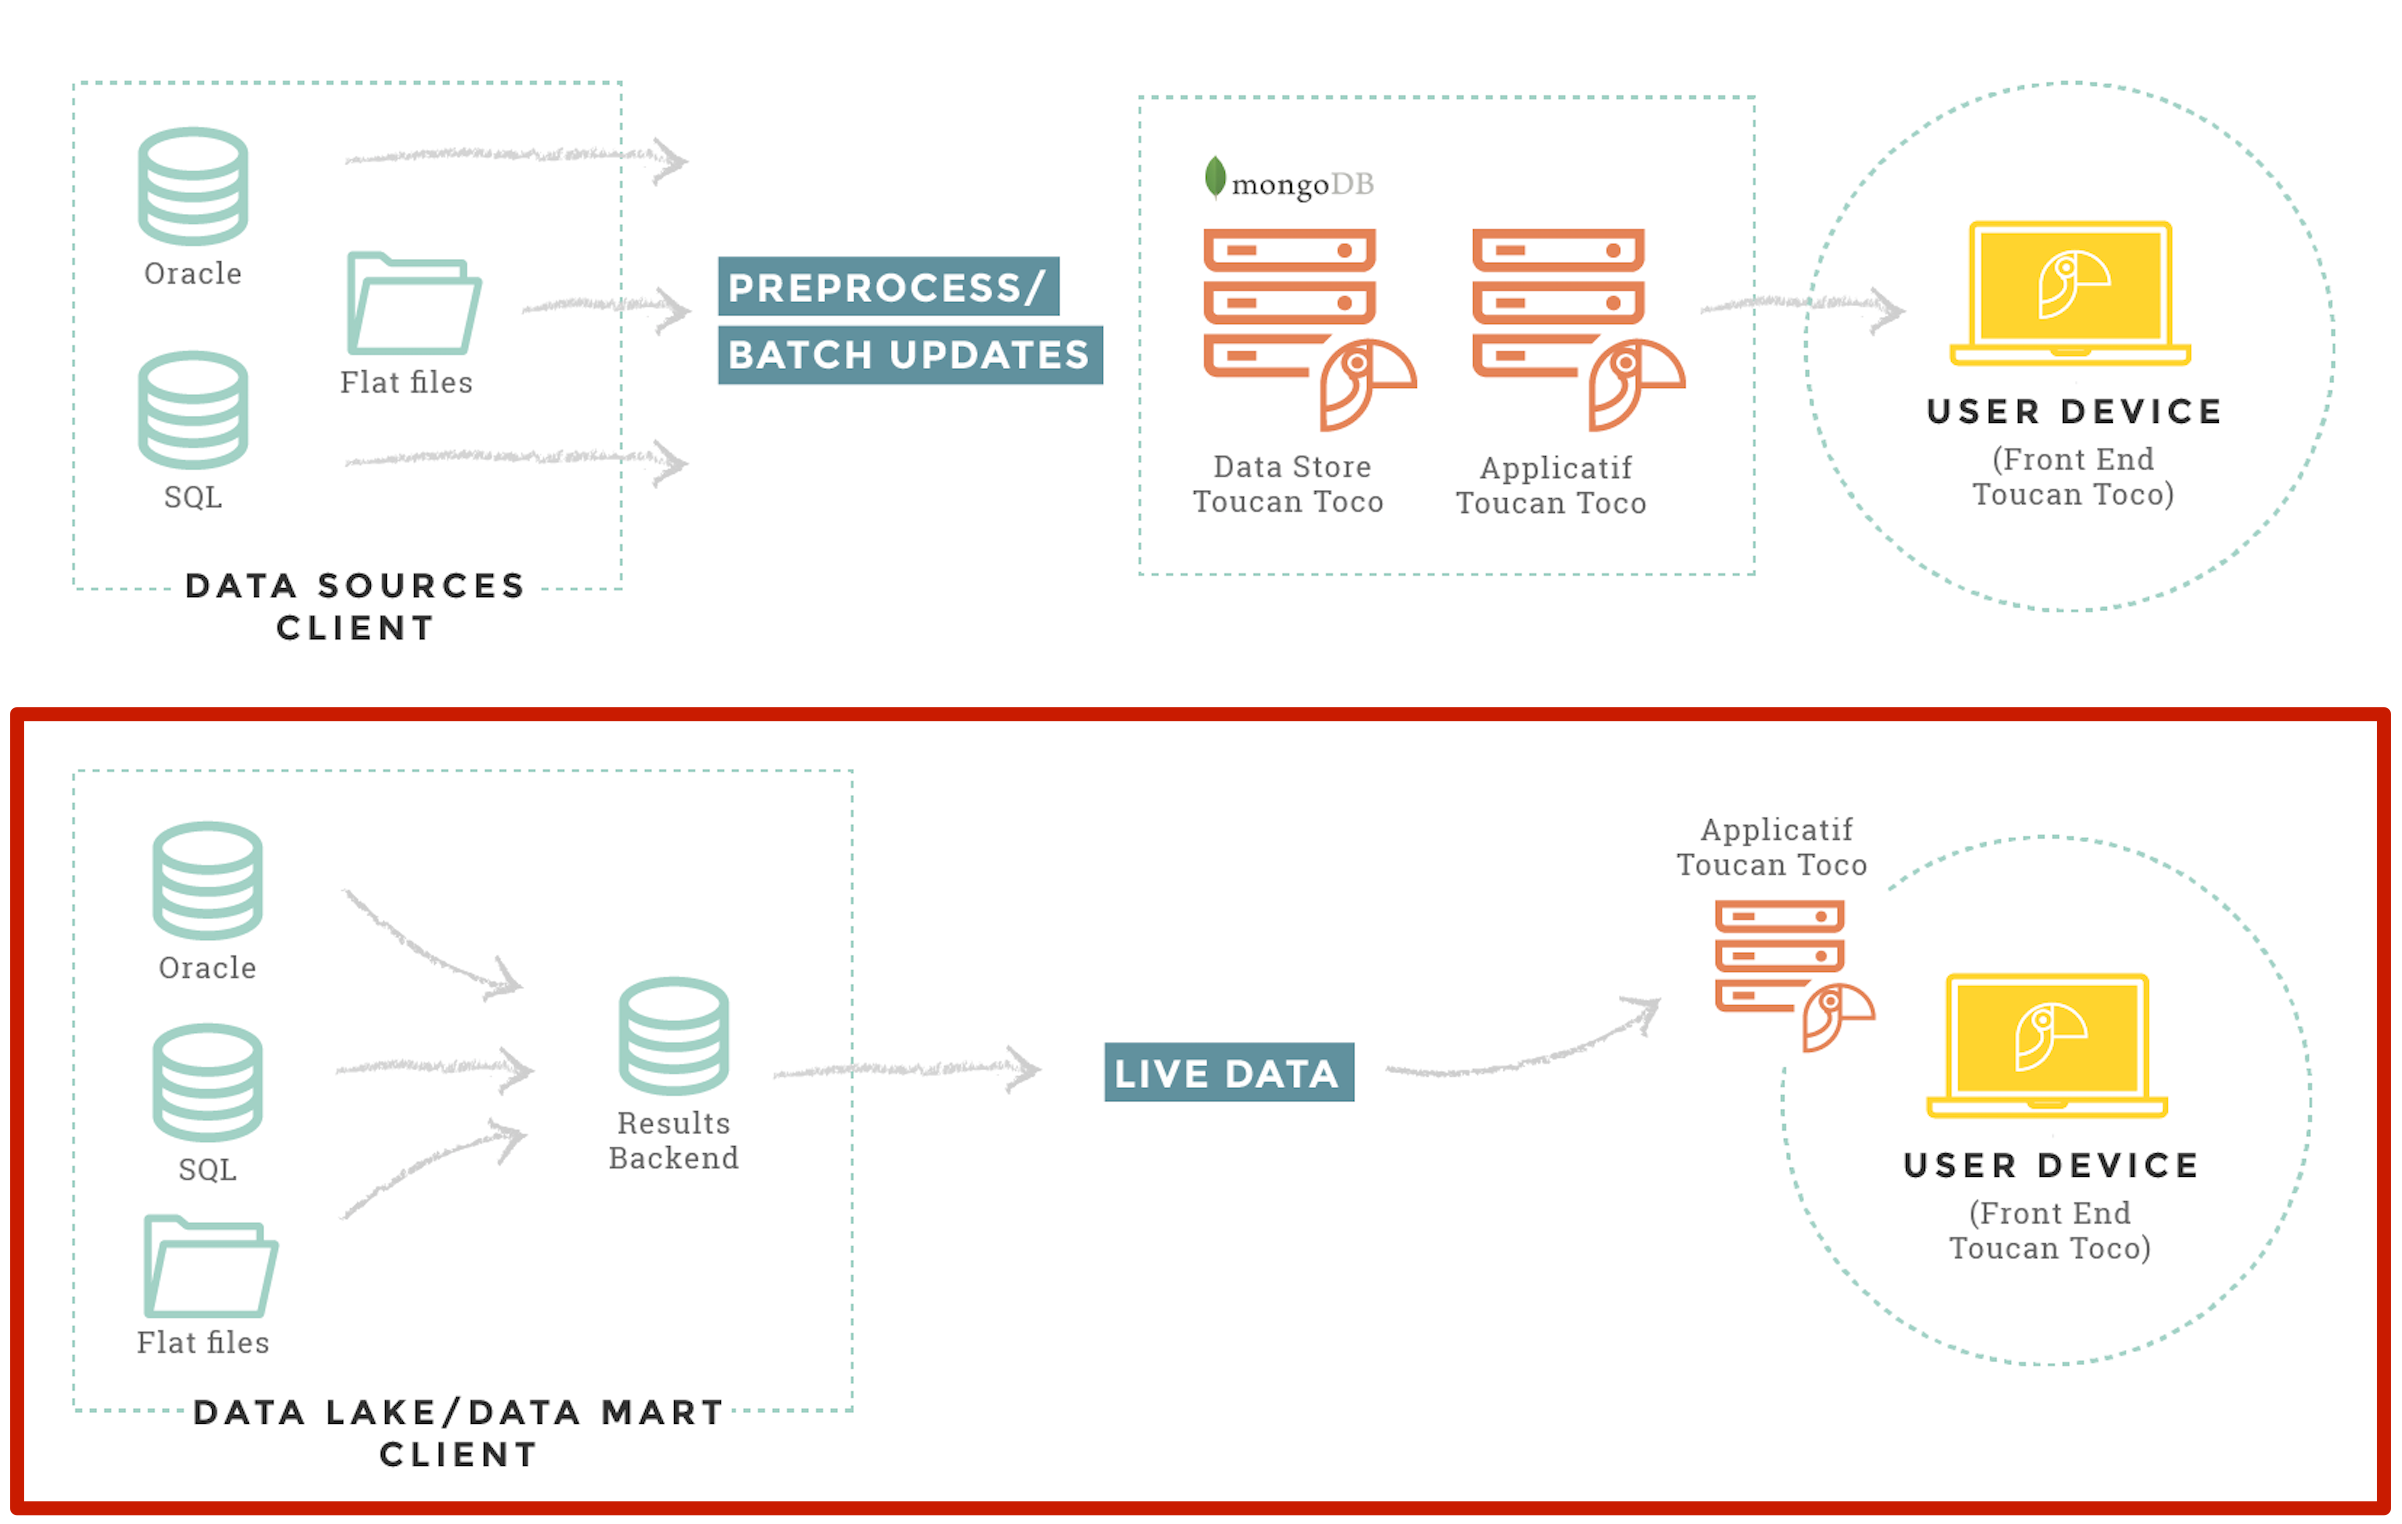
If you have the necessary infrastructure, you can query your databases or APIs directly without the need of importing data to Toucan Toco database.
Note
Keep in mind that in Toucan Toco, you can combine both the batch processing mode (where you store data views in the Toucan datastore) and the live data mode, where you query directly your system in real time. You do not necessarily need to choose between both, just use the most appropriate for your needs. Maybe you want some aggregations to be updated weekly, while you need to see detailed views in real time.
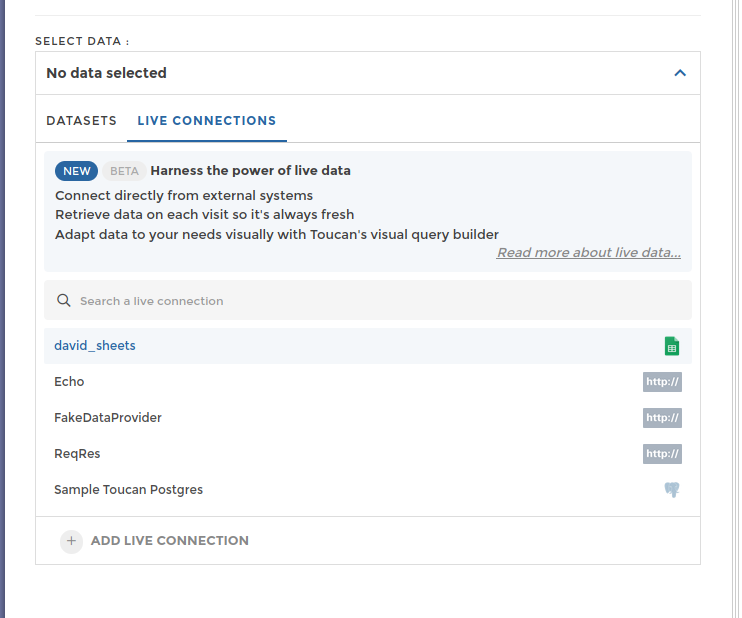
New method: directly when creating a story, tile or requester
When configuring a new query for a story, tile or requester, use the new “Live connections” tab. Any connection configured in the “Connectors” interface will be found here.
Warning
For SQL databases, if you write manually a custom SQL query instead of using the graphical selection tool, note and be aware that in some cases it will prevent you from fully exploiting YouPrep due to some incompatibilities when the pipeline is deleguated to the datasource (Native). However, if you need to use a custom SQL query, we strongly advise you to introduce a “keep columns” YouPrep step (and selecting columns you need for your data prep) at the start of your pipeline.
Choose one and configure your query using the same form used to extract data.
Some tips to create a good query:
- This query will be executed on each visit, so it must be fast! Only select the data you need.
- You can apply transformations afterwards, visually. It’s very powerful! Don’t abuse it though, as this transforms must be computed each time the query is executed.
Warning
No live query can request more than 10k rows. This hard limit ensures loading times stay fast.
Variables
Requesters
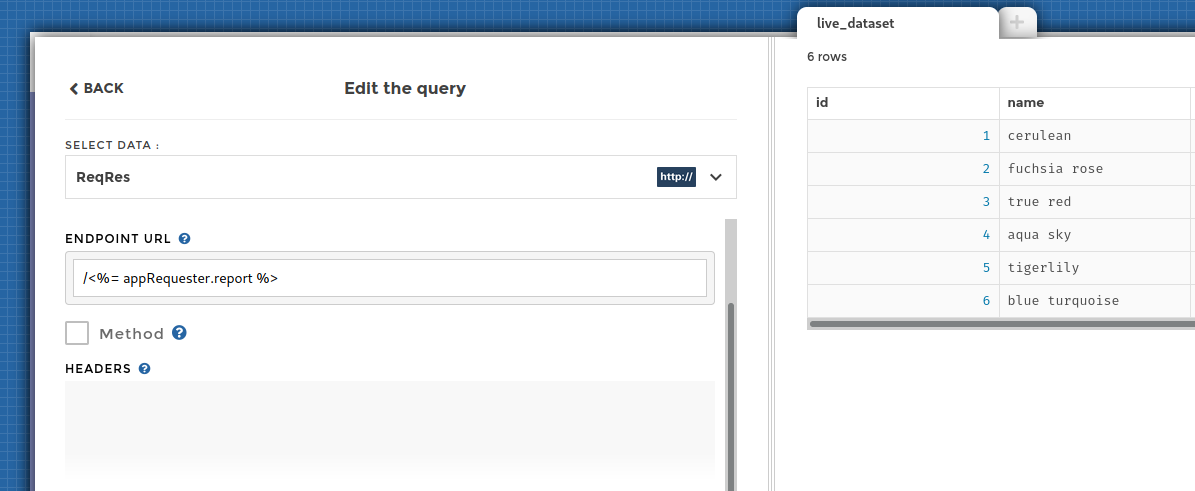
You can use variables from requesters in your queries. Either in the
query configuration part, using the <%= ... %> syntax:
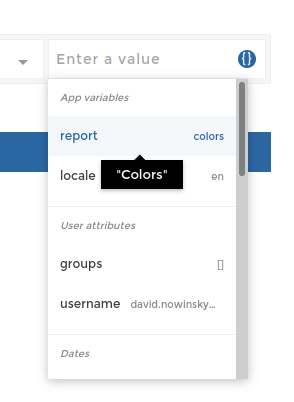
Or in the transformations using the variables’ menu:
Warning
Using variables tied to user choices can lead to security issues. An
example would be to use a variable for the table name in a SQL query
(FROM clause). Such query will always fail.
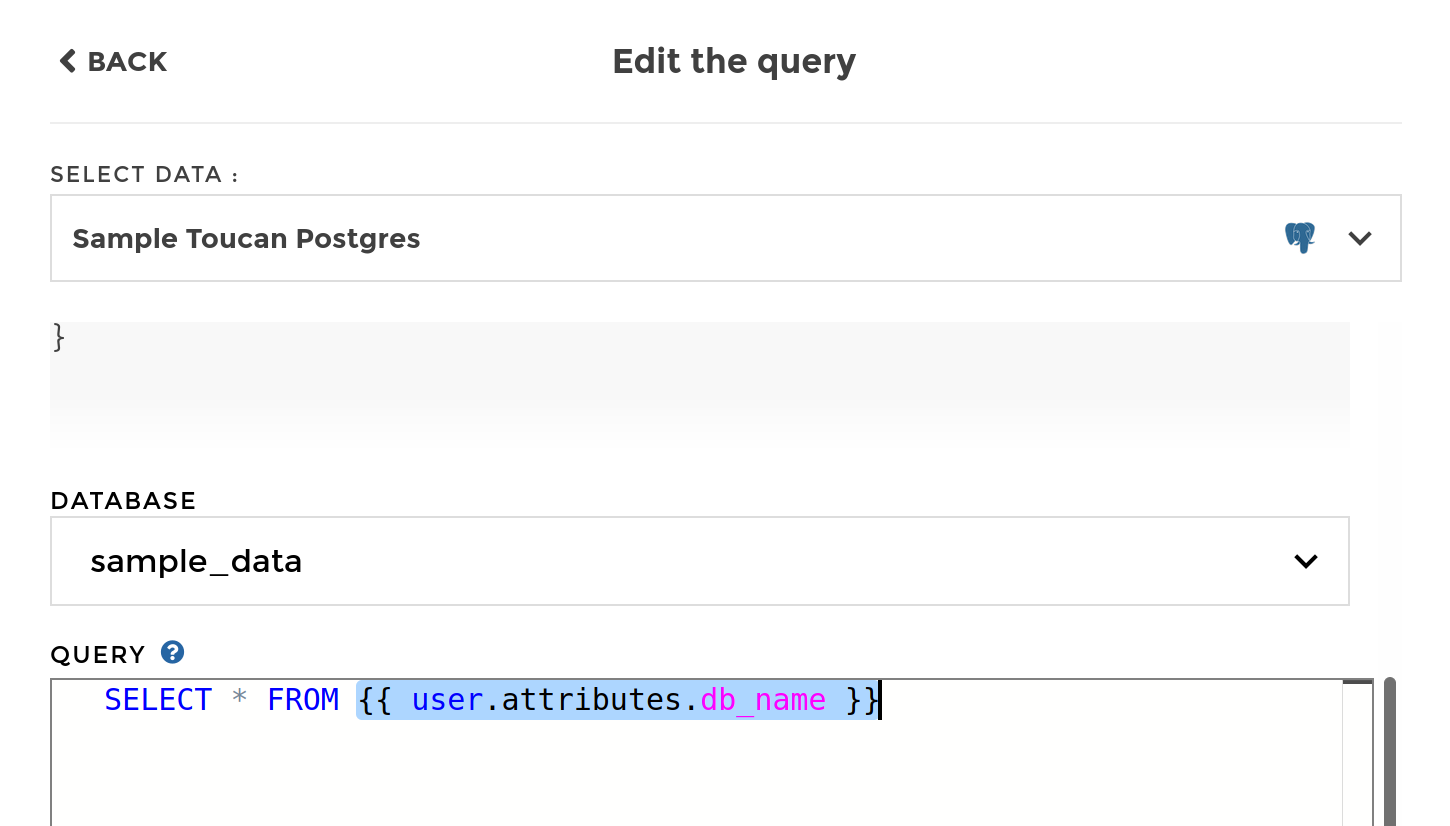
User attributes
Attributes found in the user profile (generally filled by the SSO or
forwarded in a token in the embed case) can also be used to generate
your query, using the {{ user.attributes }} syntax (jinja).
Note
Attributes depeneding on the authenticated user can’t be tampered, they are not a user choice. Therefore, these can be used anywhere to generate your query, without any security concern.
Legacy method: live data domains
This method hs been superseded by the one above. Still, it remains available.
The steps are:
- setup your data provider in etl.cson file
- query the data provider to create live domains in DATA_SOURCES in
etl.cson file (with the option
live_data: true, and that’s it !) - use the domains in your views in front_config.cson
1 - setup your data provider
As there is no data store, you will directly query your data from a data provider. The data provider is setup in the DATA_PROVIDERS array in etl.cson file. Here what it should look like :
DATA_PROVIDERS: [
  {
    type:    'my_type'
    name:    'my_data_provider'
    host:    '142.0.0.3'
    port:    93748
    database:    'api-tctc-toctoc'
    username:    'my_username'
    password:    'secure_password'
  }
]
The type available are :
- MongoDB
- GoogleAnalytics
- MySQL
- PostgreSQL
- HttpAPI
2 - query the data provider to create domains
Creating data sources using this new data provider will expose live data
domains to be used in your stories. You MUST set parameter
live_data: true on each of these data source. The DATA_SOURCES
array should look like this in the etl.cson:
DATA_SOURCES: [
  {
    domain:    'my_domain'
    name:    'name_of_data_provider'

    # ...
    # use here the syntax of your data provider
    # ...


    live_data: true
  }
,
  {
    domain:    'an_other_domain'
    name:    'name_of_data_provider'

    # ...
    # use here the syntax of your connector
    # ...

    live_data: true
  }
,
...
]
NB : these domains won’t appear in our app’s data explorer.
3 - use the domains in views
In order to use live data sources in your stories, simply declare the domain you want to use in your query.
chartOptions:
  data:
    query:
      domain: 'my_domain'
You can use multiple queries :
chartOptions:
  data:
    query:[
      domain: 'my_domain1'
    ,
      domain: 'my_domain2'
    ]
    multiple_queries: true
You can also adjust your data using postprocess and multiple query.
4 - Templating
In the front_config you might want to use templating :
chartOptions:
  data:
    query:
      domain: 'my_domain'
      column_name: '<%= requestersManager.requesterOnMyColumn %>'
In this case you have to report this template in the etl :
DATA_SOURCES: [
  {
    domain:    'my_domain'
    name:    'name_of_data_provider'
    query:[
      domain :
      column_name: '%(column_name)s' # you report here your template
    ...
    ]
    live_data: true # mandatory
  }