Frequently Asked Questions
Answers for industrious sysadmins
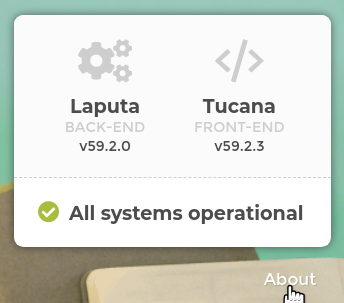
How to know the current version of my Toucan Toco app?
It’s pretty simple to find out your frontend and backend version with a basic curl command:
curl https://${backend_domain}/

curl https://${frontend_domain}/tucana-version.txt
This information is also accessible in a browser, on the bottom-right corner of the login page:
What’s your release frequency? When do I need to upgrade the app?
We release a new version of our frontend and backend every month.
The release is available the last week of each month and contains the last improvements and fixes of the product.
All the details (features, fixes, breaking changes) about a given release is available on our release notes page.
In case of critical fixes or security updates that can’t wait a month to be published, we directly patch the latest release and create a new version. You will also receive a security note by email about it.
The latest release is always available behind the latest-monthly
tag.
It means a bit more maintenance work for us but it ensures the Toucan Toco platform stays perfectly secure anytime.
We strongly recommend to update your stack at least every quarter.
I can’t login to the Toucan Toco app, why?
In some cases, you can reach the Toucan Toco app with your browser, you know your IDs are good but you are not able to login.
First you need to be sure that your browser is able to reach the frontend and also the backend servers.
Moreover please be sure there is no proxy between the servers and your browser, which could remove some HTTP headers.
Some of them are mandatory (like the authorization one) for using
the Toucan Toco app. Please check with your IT team for more details.
Can I host frontend and backend servers on the same machine?
How can I serve my Toucan Toco app over SSL/TLS ?
As explained in the requirements section, implementing the SSL/TLS termination is up to you, but here is an example of how you could add this feature to a docker-compose stack using Caddy:
[...]
  backend:
    image: quay.io/toucantoco/backend:latest-monthly
    depends_on:
      - mongo
      - redis
    expose:
      - 80
  frontend:
    image: quay.io/toucantoco/frontend:latest-monthly
    environment:
      API_BASEROUTE: https://api-toucan.mydomain.com
    expose:
      - 80
  caddy:
    image: caddy/caddy:alpine
    volumes:
      - ./Caddyfile:/etc/caddy/Caddyfile:ro  # see Caddyfile content below
      - ./mydomain.com.crt:/certs/mydomain.com.crt:ro
      - ./mydomain.com.key:/certs/mydomain.com.key:ro
    environment:
      FRONTEND_DNS: toucan.domain.com
      FRONTEND_SERVICE: frontend
      BACKEND_DNS: api-toucan.domain.com
      BACKEND_SERVICE: backend
      SSL_CRT: /certs/mydomain.com.crt
      SSL_KEY: /certs/mydomain.com.key
    ports:
      - "80:7000"
      - "443:8000"
    depends_on:
      - backend
      - frontend
[...]
(note that in this docker-compose file, frontend and backend
services ports are not exposed outside of the Docker network anymore,
since this is now delegated to caddy)
Caddyfile:
# Port 8000 is for incoming https traffic
# Port 7000 is for incoming http traffic -> redirect it to https
:7000 {
  redir https://{host}{uri}
}

# Frontend TLS termination proxy
http://{$FRONTEND_DNS}:8000, https://{$FRONTEND_DNS}:8000 {
  tls {$SSL_CRT} {$SSL_KEY}
  reverse_proxy {$FRONTEND_SERVICE}:80
}

# Backend TLS termination proxy
http://{$BACKEND_DNS}:8000, https://{$BACKEND_DNS}:8000 {
  tls {$SSL_CRT} {$SSL_KEY}
  reverse_proxy {$BACKEND_SERVICE}:80
}
Can I serve both Toucan Toco’s frontend and backend under the same domain ?
Frontend and backend services are decoupled but nothing prevents you
from configuring your proxy configuration to make them accessible under
the same domain name, for example by serving the backend under some http
path prefix, e.g /_api/.
From the example above (using Caddy), one can achieve this by updating
the API_BASEROUTE environment variable to
https://toucan.mydomain.com/_api/, and by updating the Caddyfile:
# Backend TLS termination proxy (using the same DNS as the frontend)
http://{$FRONTEND_DNS}:8000/_api/*, https://{$FRONTEND_DNS}:8000/_api/* {
  uri strip_prefix _api
  tls {$SSL_CRT} {$SSL_KEY}
  reverse_proxy {$BACKEND_SERVICE}:80
}
My connector does not work, how can I add its dependencies to my self-hosted stack?
The Toucan Toco Docker image is as light as possible. This is why we avoid installing some extra packages/dependencies that are only needed in specific cases or contexts.
Some Toucan Toco connectors need these extra packages.
You can find the list of these connectors on the Toucan Toco connectors public repository.
If you need to use one of these connectors, you will have to declare it
explicitly with the TOUCAN_EXTRA_CONNECTORS environment variable:
E.g:
TOUCAN_EXTRA_CONNECTORS='["azure_mssql", "oracle"]'
This will trigger the download and the installation of theses
dependencies when the quay.io/toucantoco/backend container starts.
If downloading and installing these dependencies at start time is not an option, you can still create your own image from the one we provide with these dependencies built in.
Example Dockerfile:
``` FROM quay.io/toucantoco/backend:latest-monthly
RUN toucan-ctl install_connectors azure_mssql oracle ```
While overriding the image is very flexible for adding arbitrary dependencies, it is also an easy way to break the Toucan stack and get errors that we won’t be able to reproduce. Also, please note that this will require that you manage (build, store, update) the resulting image by yourself.
I have an old application and I’m not able to update it on my new stack, what’s going on?
Since version v28.5, the augment should now use the pipeline syntax.
If you need to keep using the old syntax, you will have to declare the
environment variable TOUCAN_OLD_AUGMENT_WHITELIST when you launch
your quay.io/toucantoco/backend container.
The TOUCAN_OLD_AUGMENT_WHITELIST is a list of small apps, which will
keep using the old augment system.
E.g:
TOUCAN_OLD_AUGMENT_WHITELIST='["small_app_1", "small_app_2"]'
I do not use Nginx in production, I won’t be using your docker image to serve Toucan Toco frontend, what can I do ?
We don’t provide anymore an archive with all the static assets. However if needed, you can simply extract the files from the docker image with the following command:
docker run \
  --rm \
  --entrypoint /bin/cp \
  --user `id -u`:`id -g` \
  -v /tmp/:/tmp/toucantoco-sources/ \
  quay.io/toucantoco/frontend:latest-monthly \
  -r /usr/share/nginx/html /tmp/toucantoco-sources/frontend-latest-monthly
If everything is ok, you should find on your Docker host the directory
/tmp/frontend-latest-monthly with all the frontend files.
But to be ready for the production, you will need to:
- set the
scripts/tc-params.jsby at least specifyingAPI_BASEROUTE - if you are in an embed context, you will also need to manually modify
embed-params.jsonby settingAPI_BASEROUTE - then you need to set up a virtual host on your favorite web server
with the content of
/tmp/toucantoco-sources/frontend-latest-monthlyas a docroot
Finally you can deploy the content of
/tmp/toucantoco-sources/frontend-latest-monthly on an S3
bucket or on a docroot of your favorite
web server.
Please note more settings are available and described on the dedicated page.
How do I install analytics applications on my self-hosted stack ?
The tool we chose to monitor our analytics and base our analytics app on is mixpanel. To be able to have the analytics self-hosted, your will have to create a new mixpanel account and a dedicated project on mixpanel with its own token.
Once you have created your account you will need :
- API Secret: copy this value in the Analytics app etl_config.cson
file (it should replace the string
'{{ analytics.mixpanel_api_secret }}'in this file). - Token : copy this value in the frontend
www/scripts/tc-params.jsfile, under the key namedMIXPANEL_ANALYTICS_ID.
I have timeout issues with the screenshot features
Typical message you can have:
Error while rendering the screenshot: TimeoutError: waiting for selector ".tc-slide__content, .tc-story" failed: timeout 30000ms exceeded
It’s important to understand, the screenshot features work like your own usual browser: The screenshot container needs to be able to reach the backend and the frontend through their DNS.
Here’s a procedure to help you debug if your screenshot container is ready:
# Go inside the screenshot container as root
$ docker exec -u root -it <screenshot-container-name> bash

# Install usual debug tools
root@<screenshot-container-id>:app/# apt-get update
root@<screenshot-container-id>:app/# apt-get install telnet curl ca-certificates bind9-host

# Confirm the DNS resolution
root@<screenshot-container-id>:app/# host $FRONTEND_DNS
root@<screenshot-container-id>:app/# host $BACKEND_DNS
# should return something like: $FRONTEND_DNS has address WW.XX.YY.ZZ

# Confirm you can "connect" to the frontend and the backend on HTTPS port
root@<screenshot-container-id>:app/# telnet $FRONTEND_DNS 443
root@<screenshot-container-id>:app/# telnet $BACKEND_DNS 443
# should return something like: Connected to $FRONTEND_DNS.
# you will need to force quit with Ctrl+C

# Confirm you can access to the home page
root@<screenshot-container-id>:app/# curl -sL -w "%{http_code}" -k "https://$FRONTEND_DNS" -o /dev/null
root@<screenshot-container-id>:app/# curl -sL -w "%{http_code}" -k "https://$BACKEND_DNS" -o /dev/null
# should return: 200
Don’t hesitate to contact us with the result of this debug process.
How can I setup SSO on my instance:
External identity providers (called IdP in this doc) can be configured
in the instance_settings.cson file for your instance. To download
this file, you must login with an super admin. Then go to the settings
page : https://<front-end url>/settings.
In instance_settings there is an array describing all available IdP.
Each provider should have a type, below are available types.
- local: connect with username/password
- SAML2: delegate authentication to an external provider using SAML2.
- OIDC: delegate authentication to an OpenID Connect provider
All available types of IdP can be used together and multiple times.
Common properties
- id: a unique ID for the provider, used to build redirect and metadata
urls (we refer to this as
provider idin the examples below) - name: display name
- icon: name of an icon representing the provider (we use font awesome)
- discrete: (boolean) when set to
truethe provider will be available below other options as a simple html link
SAML2 configuration
There are two main components to the SAML2 configuration:
- sp : service provider, i.e. your Toucan Toco instance
- idp : identity provider, i.e. the authentication service
SP configuration
Configuring the SP on Toucan Toco will allow you to create a SP “metadata” file. Most IdPs let you use this metadata file to configure a new SP (Toucan Toco) automatically on their end. You will be able to download this file at the end of this section.
First, we need to gather the following information (the provider id
here is the value of the field id in this provider configuration):
- entityID: by convention we use the url for Toucan Toco backend
- assertionConsumerService:
- url:
https://<backend-hostname>/auth/provider/<provider id>/acs - binding:
'urn:oasis:names:tc:SAML:2.0:bindings:HTTP-POST' - x509 certificate: to encrypt SAML2 exchanges
Follow your Complany Policy to generate a x509 certificate.
This is an example of a typical service provider block:
sp:
  entityId: 'https://<backend-hostname>'
  assertionConsumerService:
    url: 'https://<backend-hostname>/auth/provider/<provider id>/acs'
    binding: 'urn:oasis:names:tc:SAML:2.0:bindings:HTTP-POST'
  NameIDFormat: 'urn:oasis:names:tc:SAML:2.0:nameid-format:unspecified'
  x509cert: <...>
The metadata file to use when configuring your IdP will now be available here:
https://<backend-hostname>/auth/provider/<provider id>/metadata
IdP configuration
In order to configure the IdP part, we need to set the values of:
- entityId
- singleSignOnService url
- singleSignOnService binding
- x509 certificate
Other settings
- user_provisioning: (bool) when set to
false, users won’t be able to log in unless they already exist in Toucan Toco’s internal database. Default istrue, which means that they will be created on-the-fly. - mapping:
- nameId: (string) jq filter used to override the username of the connected user with a value found in the metadata sent by the IdP.
- userTemplate: allows to override default rights of users who connect via the SSO (applied each time they log in)
- privileges:
- SmallAppName: an arrays of privileges (i.e.
['view']or['contribute']). By default, users won’t have any privilege (they will see an empty store).
- SmallAppName: an arrays of privileges (i.e.
This is an example usage:
user_provisioning: false  # users won't be created on-the-fly
mapping:
  nameId: '.Email'  # replace the username with the "Email" attribute
userTemplate:
  privileges:
    SmallAppName: ["view"]  # users will see all small apps
Example
Complete configuration of a SAML2 auth provider:
id: '<provider id>'
name: '<providr display name>'
type: 'SAML2'
icon: '<font awesome icon id>'
config:
  defaultRedirectUrl: '<frontend URL>'
  security:  # Optional, see https://github.com/onelogin/python-saml#settings for reference
    authnRequestsSigned: true
    signedMetaData: true
  sp:  # This part will be used to generate the metadata XML file
    entityId: 'https://<backend-hostname>'
    assertionConsumerService:
      url: 'https://<backend-hostname>/auth/provider/<provider id>/acs'
      binding: 'urn:oasis:names:tc:SAML:2.0:bindings:HTTP-POST'
    NameIDFormat: 'urn:oasis:names:tc:SAML:2.0:nameid-format:unspecified'
    x509cert: '<...>'
  idp:  # This part is where you declare the information about the third party identity provider
    entityId: 'service entrypoint'
    singleSignOnService:
      url: '<sign on url>'
      binding: 'urn:oasis:names:tc:SAML:2.0:bindings:HTTP-Redirect'
    x509cert: '<...>'
SAML2 FAQ
Why do I get a “redirect_uri_mismatch” error after login?
→ most probably because you didn’t allow the URL in your app configuration on the identity provider
Do I need to care about the “authorized_origins” parameter on my identity provider server?
→ No. This parameter is only useful for full JavaScript applications.
OpenID Connect
A lot of services act as OpenID Connect identity providers (Google, Yahoo, Azure, etc.). In order to use one of them, you’ll typically have to follow the following setup steps:
- on the identity provider server:
- register your ToucanToco app (e.g.
https://developers.google.com/identity/protocols/OpenIDConnect).
If the registration is successful, you should be given a couple
client_id,client_secretthat will be used as credentials for you app, - configure your application permissions (e.g. what kind of information about an user your application will be allowed to ask for),
- you’ll generally have to authorize the URL that the identity
provider will call after a successful login. The exact name of the
configuration field you’ll have to set will vary depending on your
identity provider: for instance, on auth0, it’s called
Allowed Callback URLs, on google, it’s calledAllowed redirect URIs. The URL you have to set is alwayshttps://<backend-hostname>/auth/provider/<auth-provider-id>/auth_callback, for instance:https://<backend-hostname>/auth/provider/google_openid_connect/callback
- register your ToucanToco app (e.g.
https://developers.google.com/identity/protocols/OpenIDConnect).
If the registration is successful, you should be given a couple
- on the toucantoco application:
- specify the identity provider information, as generally provided trough a specific endpoint (e.g. https://accounts.google.com/.well-known/openid-configuration) Those endpoints are sometimes discoverable automatically but we don’t support this feature for now,
- specify your app’s credentials,
- specify the front-end’s URL, the backend will need it to send you back to your application after the authenication process is over,
- specify the required scopes (i.e. what information the Toucan will
ask for). The default is
['openid', 'email']if you don’t specify it but you can ask for anything the identity provider claims to support. Unsupported scopes will eventually be ignored anyway. - optionally, customize the
userinfo
request. The default behavior is to perform a
POSTrequest and send theaccess_tokenin the message body. You can override this by specifying auserInfoRequestproperty and specify itsmethod,behaviorandheaderssubproperties. For instance:javascript 'userInfoRequest': { 'method': 'GET', 'behavior': { 'use_authorization_header': True, }, 'headers': { 'X-Whatever': 'hola', }The python library that we use will parse and check the response sent by the IdP. If the response doesn’t strictly conform with the expected openid schema, the authentication will fail. For instance, it will fail if theemail_verifiedproperty is returned as a string (e.g"true") instead of a boolean (e.g.true). Since you probably won’t be able to change your IdP’s behavior, you can tweak the list of properties to check using theuser_info_schema.ignore(blacklist-mode) oruser_info_schema.validate_only(whitelist-mode). For example, the following settings will ignoreemail_verifiedvalidation:"userInfoRequest": { "user_info_schema": { "ignore": ["email_verified"] } }
Below is a template of configuration for an OpenID Connect authentication provider:
id: '[id]'
name: '[name]'
type: 'OIDC'
icon: '[icon]'
config:
  providerConfig:
      issuer: "https://accounts.google.com"
      authorization_endpoint: "https://accounts.google.com/o/oauth2/v2/auth"
      token_endpoint: "https://oauth2.googleapis.com/token"
      userinfo_endpoint: "https://openidconnect.googleapis.com/v1/userinfo"
      revocation_endpoint: "https://oauth2.googleapis.com/revoke"
      jwks_uri: "https://www.googleapis.com/oauth2/v3/certs"
      response_types_supported: [
          "code"
          "token"
          "id_token"
          "code token"
          "code id_token"
          "token id_token"
          "code token id_token"
          "none"
      ]
      subject_types_supported: [
          "public"
      ]
      id_token_signing_alg_values_supported: [
          "RS256"
      ]
      scopes_supported: [
          "openid"
          "email"
          "profile"
      ]
      token_endpoint_auth_methods_supported: [
          "client_secret_post"
          "client_secret_basic"
      ]
      claims_supported: [
          "aud"
          "email"
          "email_verified"
          "exp"
          "family_name"
          "given_name"
          "iat"
          "iss"
          "locale"
          "name"
          "picture"
          "sub"
      ]
      code_challenge_methods_supported: [
          "plain"
          "S256"
      ]
  defaultRedirectUrl: HTTPS://YOUR_FRONTEND_URL
  appCredentials:
    client_id: 'your app-client id'
    client_secret: 'your app-secret id'
  userInfoRequest:
    method: "GET"
    behavior:
      use_authorization_header: true
    user_info_schema:
      ignore: ["email_verified"]
Once again, providerConfig might seem huge and overwhelming but in
most cases, it’s merely a copy and paste of the information given by
your identity provider. You should not have to alter it.
When dealing with token_endpoint_auth_methods_supported we take the
first value as the authentication method and it has to be compatible
with the appCredentials; if the credentials consist of a client_id
/ client_secret then it must be one of the following:
client_secret_basicclient_secret_postclient_secret_jwt
After you updated the instance settings, the new auth provider will be
listed on https://<backend-hostname>/auth/providers and the Service
Provider’s metadata are available to download at
https://<backend-hostname>/auth/provider/[name-of-your-idp].
What about the redundancy of the stack?
Warning
The purpose of the article is to give advice on how you can redundantly build your Toucan stack. The solutions we discuss are not the only ones that can be used. The idea behind this article is more to inform you about the points of attention you need to have to achieve effective redundancy. It is better to have some knowledges of the solutions we discuss in the rest of this article or to choose the ones you find the most accurate.
Our backend is stateful so you need to consider a distributed filesystem :
- NFS or
- if you use an orchestrator like Docker Swarm or Kubernetes, Rook could be a good choice).
An architecture could include the following components:
- A MongoDB cluster through MongoDB Atlas or with MongoDB community edition
- A Redis cluster through Amazon ElastiCache or natively with Redis
- A load balancer for load distribution between the frontend containers
- A load balancer for load distribution between the backend containers
- A distributed filesystem with read/write permissions for the backend containers.

Toucan Toco - redundancy workflow
How do I deal with scalabilty?
By scalability we mean managing more concurrent users on a Toucan Toco instance.
The two main user roles are Viewer and App Builder. To manage several Viewers in parallel, you just need more available gunicorn workers. We have two types of workers in Toucan, Celery and Gunicorn workers
Scaling with Toucan
As Toucan backend is a REST API, its ability to handle more and more tasks comes down to its ability to handle more and more HTTP requests. Toucan Toco chooses to solve this issue by using Gunicorn as a Web Server Gateway Interface (WSGI).
To scale your Toucan Toco instance you need to use or add more core cpu.
We recommend to use the following number of workers is:
2*CPU +1
Let say you have your Toucan Toco backend stack running on dual-core machine we recommend to use 5 workers, default value in Toucan Toco.
Gunicorn Workers and App Performance
This can become particularly impactful for the /data route. When the
frontend tries to get data from the backend via queries built by the app
builders.
In Toucan, app builders autonomously create queries that are addressed via a frontend to the Toucan backend. The queries can target the MongoDB database underlying the application or a third-party system (REST API, analytical database).
These requests are made via the /data route, if a request is asking
for too much data because it is badly designed. The worker that will
receive the task to process this request will wait for the response from
the mongoDB database or the third party data system. In the meantime as
explained it will not be able to receive other tasks which will have to
be processed by other workers if they are available.
An application with slow requests will require more workers to be seen by more concurrent users.
Before increasing the number of workers of an instance, one should always check that the application is designed in the most efficient way possible
### Configure your Toucan Toco backend workers number If you want to change your gunicorn worker number for you Toucan Toco backend, you can go in your environment variables
TOUCAN_GUNICORN_WORKERS: value*
*default value: 5
We are thinking of another way to increase the number of workers by running several containers in parallel behind a load balancer.
How to migrate a small app from a stack to another one
If you have two different stacks, one for production and one for pre-production, you can migrate your small app from a stack to another by using the Toucan Toco Toolbox image.
The Toucan Toco Toolbox will:
- extract the small app from an instance as a directory with 2
tar.gzarchives (one for the databases and another for potential data storage) - restore it to another instance.
To export a small app, you only need to run the Toucan Toco Toolbox with the right parameters as follow:
$> docker run --rm \
  --network=PREPROD_STACK_NETWORK \
  -v /path/where/to/store/your/small_app/:/tmp \
  -v /path/to/stack/shared/volumes/storage:/storage \
  -e "MONGO_URI=mongodb://MONGO_PREPROD_USER:MONGO_PREPROD_PASSWORD@MONGO_PREPROD_HOST:MONGO_PREPROD_PORT" \
  -e "BACKEND_URL_SPECIFIC=https://BACKEND_PREPROD_URL" \
  -e "SMALL_APP_SPECIFIC=THE_SMALL_APP_TO_BACKUP" \
  quay.io/toucantoco/backup:toucan_backend_toolbox_100.5.1-latest \
  toucan_backup
Once the export is done, you will find the small app dump in your local
machine under a directory called on-premise_backup-XXXXXXXX where
XXXXXXXX is a random string; Inside this directory you will find the
following files:
on-premise_backup-XXXXXXXX
├── laputa_version
├── mongodump.tar.gz # Contains all the related MongoDB data of your small app
└── storage.tar.gz # Contains all the related storage data of your small app
To restore the small app you need to run the Toucan Toco Toolbox with the right parameters as follow:
$> docker run --rm \
  --network=PROD_STACK_NETWORK \
  -v /path/to/your/small_app/dump/on-premise_backup-XXXXXXXX:/tmp/on-premise_backup-XXXXXXXX \
  -v /path/to/stack/shared/volumes/storage:/storage \
  -e "MONGO_URI=mongodb://MONGO_PROD_USER:MONGO_PROD_PASSWORD@MONGO_PROD_HOST:MONGO_PROD_PORT" \
  -e "BACKEND_URL_SPECIFIC=https://BACKEND_PROD_URL" \
  -e "BACKEND_USER_SPECIFIC=USER_PROD" \
  -e "BACKEND_PASSWORD_SPECIFIC=PASSWORD_PROD" \
  -e "SMALL_APPS_SPECIFIC=THE_SMALL_APP_TO_RESTORE" \
  quay.io/toucantoco/backup:toucan_backend_toolbox_100.5.1-latest \
  toucan_restore /tmp/on-premise_backup-XXXXXXXX /storage
⚠️ If a small app with same name already exists on the production stack,
it will be overwritten. If you want to restore the small app with a
different name, you need to specify the new name in the
SMALL_APPS_NEW_NAME_SPECIFIC environment variable.
By running this command the Toucan Toolbox will fully restore your small app to the new stack.
⚠️ Keep in mind, the process has some limitations. The process won’t import the small apps secrets, you should recreate them manually if your small app depends on them.
My Mongo uses a SSL connection where the certificates are self-signed, how can I configure the Toucan Toco backend?
First, you will need to mount the authority certificate you use to sign the MongoDB certificates in the Toucan Toco backend container.
Let’s suppose you mount it as /etc/ssl/myCA.crt, then you will need
to use a MongoDB connection string to connect and adapt it as:
TOUCAN_MONGODB_HOST='mongodb://${USER_RW}:${PASSWORD_RW}@mongo.yourdomain.com:27017/api-toucan?retryWrites=true&authSource=admin&tls=true&tlsCAFile=/etc/ssl/myCA.crt'
TOUCAN_MONGODB_READONLY_HOST='mongodb://${USER_RO}:${PASSWORD_RO}@mongo.yourdomain.com:27017/api-toucan?retryWrites=true&authSource=admin&tls=true&tlsCAFile=/etc/ssl/myCA.crt'
How does your MS Teams Bot work and how can I add it to my self-hosted stack?
Add the MS Teams bot to your self-hosted stack
If you want to add MS Teams to stack follow this documentation to be able to receive :
- Annotate & share
- Comments on a story (a screenshot of the story is attached to the message posted in Teams)
- PDF Report / Home
- Alerts
on your MS Teams workspace.
How does the integration work?
Toucan Toco authorizations over your MS Teams workspace
Toucan backend will be authorized to :
- send messages and images
- Obtain channels available for a Team
Security
We have build this integration with keeping security in mind.